| INDEX | 1300-1599 | 1600s | 1700s | 1800s | 1900s | CROSS-ERA | ETHNO | |
| MISCELLANY | CONTACT | SEARCH | |
|
|
Part 3: The Lining
The lining is the most important part in that it determines the shape and fit of the finished garment. If the lining fits properly, so will the robe as it is simply draped onto the lining. The lining must therefore fit you prefectly while the robe pattern itself can be used for almost all dress sizes. In a pinch you can even mount the dress fabric onto the lining without the help of a dummy or a helper.
Full-breasted people should cut the paper pattern horizontally at the level of the upper edge of the stays, from the armscye about a finger's length inwards, pull it apart a bit and use that new shape to make a new paper pattern. That's where a dart will be necessary the size and depth of which varies with the cup size. Maybe I should mention here that I don't have proof that darts of this kind were used in the 18th century. But then almost all extant robes are smallish sizes where such darts weren't necessary. It's inconceivable that full-breasted women went around with ugly folds around breast level when the remedy was so very obvious.
Cut a mock-up of the lining out of cheap fabric first. Draw the outlines directly onto the fabric and add generous seam allowances at the side and shoulder seams. Fold the back part along the CB and baste the layers together along a slanted line that runs from the fold, about 5 cm down from the upper edge, to about 5 cm away from the fold at the lower edge. I.e. you take away 10 cm from the waist width in back. The reason for this is that it was customary for sack back dresses to have lacing in the CB. First the front edges were pinned in place, then the maid dived undearneath the back pleats to tighten the lacing, making the robe fit more tightly. Pinning the front edges of a robe that is tight to begin with is a pain in the... back. Moreover, the lacing allows for a good fit even if you gain or lose some weight or lace the corset more or less tightly. What you've just done is to remove that additional width for the sake of fitting.
Lightly baste or pin the parts together and put it on over the stays, allowances to the outside. This is the one time you really, really need a helper. Pin the front edges to the stays in the shape that you want te opening to be. That would roughly be near the nipples at the top and a hand's width apart at the bottom. Pin the side seam to the sides so that they run straight. Now your helper must check the fit. The lining must fit snugly and smoothly all round. If the back is too wide top and bottom, have the surplus pinned away along the CB. If only the bottom is too wide (or if it's still too wide after the CB has been adjusted), open the side seams and let the surplus vanish there, resulting in a more slanted side edge. Same goes for the front. Pay special attention to the front around the top edge of the stays and have a horizontal dart marked there if necessary. See to it that the front edge runs straight from stays to shoulder, that the shoulder straps have the right length and the armscye is neither to large nor too small.
Adjustments, if any are necessary, should be marked directly on the fabric. If the waistline is below your waist in back, have a line drawn there. In front, the waistline curves downwards. Cut one half of the mock-up along the new lines, with one exception: The surplus width around the lower back that you've removed with the slanted basting line before must stay. If the back was too wide between the shoulder blades by, say, 3 cm, subtract that much from the bottom as well, but not more. Replace the original pattern pieces with these new ones.
Cut the lining out of the proper fabric. Add seam allowances at the sides and shoulder, a turning allowance at the front edge, and none at the waist, neckline and armscye. If the fabric tends to unravel, cut it with pinking shears (better yet, choose fabric that doesn't). Otherwise leave the edges as they are.
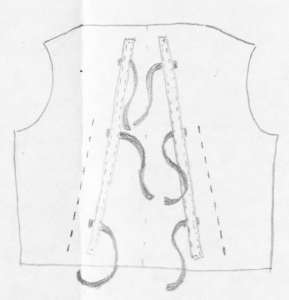
Now we'll do the back lacing. Some extant dresses actually have a gap in back with lacing holes on either side, but there's an easier way: Instead of the gap and lacing holes, you sew two tunnels onto the outside (the allowance side) of the lining. Only pin the tunnels on at first, starting about 5-7 cm below the top edge and 2 cm away from the CB on either side, slanting outwards (as the basting line did) as you go down, ending 2-3 cm above the lower edge and 6-8 cm away from the CB. It doesn't have to be exact - the lacing will even it out. Cut 6 pieces of narrow tape, 25-30 cm long, and insert them under the tunnels so that they run horizontally, the long end facing the CB, evenly spaced and at the same level on either side. I have accumulated some experience since drawing the illustration to the left, so put the top lace at slightly above armhole level. Anywhere further up should fit snugly anyway - the surplus is all below that. Instead of a lace running through holes, these tapes will be tied together in bows. New sew the tunnels onto the lining and make sure that you also catch the narrow tapes. Insert one strip of boning into each tunnel and close the tunnel. The boning will keep the back straight and smooth despite the lacing.
Next step: Cutting the robe fabric
Content, layout and images of this page
and any sub-page of the domains marquise.de, contouche.de,
lumieres.de, manteau.de and costumebase.org are copyright (c) 1997-2022 by Alexa Bender. All rights
reserved. See Copyright Page.

GDPO


This work is licensed under a Creative Commons License.