| INDEX | 1300-1599 | 1600s | 1700s | 1800s | 1900s | CROSS-ERA | ETHNO | |
| MISCELLANY | CONTACT | SEARCH | |
|
|
It doesn't matter if you're making an under-petticoat to go under the dress skirt, a visible petticoat (Jupe for a Francaise or Anglaise), or a skirt to go with a jacket: The overall method is the same. There usually are skirt supports underneath, so the skirt length can't be the same all around. The difference lies in whether you're going to wear paniers or pocket hoops underneath (i.e. side skirt supports) or a bum pad (i.e. back skirt supports). Very wide paniers as worn (chiefly) under 1740s Françaises are a special case. Please refer also to the Française instructions for those.
The pattern for an 18th century skirt is very simple: A rectangle sewn into a tube, pleated across the top and sewn to a narrow waistband. It's the adjustment of the length to various shapes and sizes of skirt support that makes it - not complicated, but complex.
The fabric consumption depends on your height and the size of the skirt support (=skirt length) on one hand and the skirt width on the other, which in turn depends on your width and that of the skirt support, again (=skirt circumference). Let's look at the skirt length first:
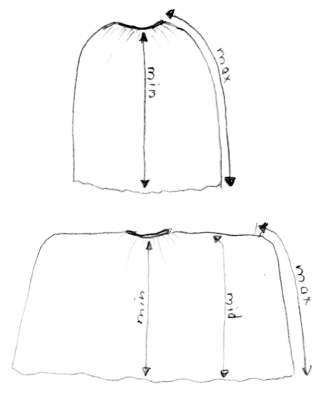 |
Sketch: Minimum and maximum skirt length How to determine the minimum and maximum skirt length for a narrow or wide panier. Do not pull on the tape while measuring! The minimum length is measured from the waist to the seam along the centre front. In case of pocket hoops or a smallish panier, the maximum length is measured from the waist down the side of the hoops (above pic). In case of a bum pad, the maximum is measured down from the centre back over the pad. The lower pic shows that in case if very wide paniers, there also is a medium length (mid) which reflects the fact that the top of the skirt has to curve around the top of the panier. The maximum length, in this case, does not start at the waist itself but further out, at waist level. |
Now for the width: No matter whether the skirt will be worn over pocket hoops, narrow panier or a bum pad, the standard (= minimum) width is 3 metres. Since most fabrics nowadays are 150 cm wide, two times the maximum skirt length should suffice. Widths of up to 3.5 metres are desirable, but if that means buying an additional metre or more of a rather expensive fabric, don't. You may or even should deviate from this rule if
The 3 metre rule has other virtues: If he skirt is made of two 150 cm fabric widths, you only need two vertical seams and the pocket slits can be made by leaving the top of the side seams open. If you want/need a skirt width of 3.5 m, you'll have to buy at least 0.5 m more if the fabric has neither pattern nor direction, in which case you can cut the additional 0.5 m from the width. Otherwise it's about 1.2 m (=max skirt length) more and you may consider adding even more width (since you've had to buy that much more fabric anyway), but I would only recommend that if it's a lightweight fabric, e.g. silk taffeta. You'll have to make three vertical seams. In that case, use one width for the skirt front, with fewer pleats, and one width plus 0.5m (or whatever) for the back, with more/deeper pleats. That allows you to still have the pocket slits integrated into the side seams, and in most cases it's desirable to have more width around the back than the front, anyway. If you're wearing a bum pad, it's the way to go.
If the skirt is to go under a robe, you may make the additional 0.5 m (or even the whole back width) out of a cheap fabric. Such "cheat skirts" have been found in the bequest of Madame Pompadour3, so even the upper crust saved fabric that way. If you make a cheat skirt, I recommend covering the lower 30-50 cm of the back with top fabric in case you want to wear the robe retroussée dans les poches (pulled through the pockets) or to prevent ebarassment in case of a high wind.
What if the fabric width is not 150 cm? In case of 90-120 cm width, ask yourself if that width can serve as yor maximum skirt length. If so, use a length of 3-3.5 m as skirt circumference. If the width is too short or much too long to serve as skirt length, or if the fabric has a pattern, consider any multiplication of the width until you arrive at somewhere around 3 m or a bit more, e.g. 4x90 cm= 360 cm, or 3x115 cm=345 cm. So you'll have to make your skirt out of 3-4 pieces.
Normally you'd sew the fabric widths together to form a tube, then neaten the hem all around. The length difference between maximum an minimum is then adjusted along the top edge. This method does not guarantee that the hem is the same distance from the ground all around, which may be the reason that the method of skirt asjustment changed during the 19th century. In the 18th century, that wasn't very important because the robe hem covered most of the skirt hem, thus hiding any inaccuracies. If there was no robe, as in skirt/jacket combinations, the skirt hem usually was well off the ground (10-20 cm above) so that little inaccuracies didn't show as much as they do if the skirt hem is meant to be only a few cm off the ground, as was the case in the late 19th and early 20th century. That's why the "take it off the top" method works.
Let's look at how the length is adjusted at the top edge. If you apply it to the front and back of the skirt separately, it doesn't matter if the back of the skirt contains more fabric than the front. Therefore, you don't sew the widths into a tube just yet. Just make sure that you have a front and a back panel.
If you're making your very first 18th century skirt, you may want to make a paper pattern out of what follows so's you can put it onto future skirts. You'll only need a strip about 25-30 cm wide and as long as one half skirt width. That way you can apply helper points and excercise drawing smooth curves without marking the fabric itself. You can also make sure that both halves of the dip are the same by flipping the paper pattern over onto the other half of the fabric.
Take the front width and fold it in half, width-wise, left side out. Mark the middle with a pin, chalk or whatever, about 2-3 cm below the top edge. Unfold again, then fold the side edges towards the middle you've just marked. Mark the new folds, again a bit below the edge. Now you have markings at the middle of the width, at one-quarter and at three-quarters. From the middle marking, measure as far down as the difference between your max and min skirt length. (The scribbled word in the top right corner means "pocket slit"; the dotted vertical lines are the side seams.)
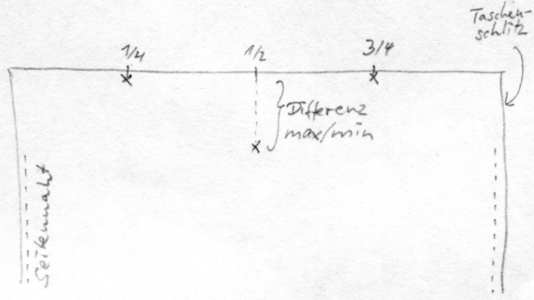
The dip starts very gradually at the 1/4 marking, has its deepest point at the 1/2 marking, and comes up again at the 3/4 marking, where it peters out. In case of the back skirt panel, make the dip 2 cm less deep than in the front (=upper dashed line) because the backside always needs more skirt length.

If you don't dare to draw the dip free-hand onto the fabric, make a paper pattern. This enables you to draw as many helper points as you like and you can re-use it for future skirts.
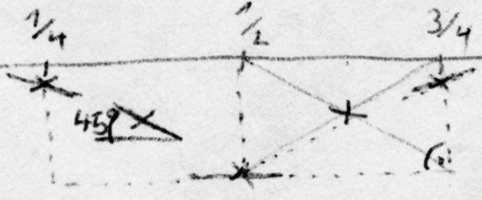
Consider that at the 1/4, 1/2 and 3/3 points, the curve hast to be horizontal (well, not quite horizontal in case of the outer points, but near enough). So to get from one point to the other, the curve must pass through a 45° angle halfway. Draw two rectangles consisting of the top of the fabric, the three verticals from the 1/4, 1/2 and 3/4 points down, and a horizontal through the deepest point of the dip. Draw two diagonals through each rectangle, connecting the opposite corners as in the right rectangle in below sketch. The point where the diagonals cross is where the dip line has a 45° angle. Draw a 45° helper line through that point, a not quite horizontal helper line through the 1/4 and 3/4 points, and a horizontal one through the deepest point at 1/2 (see left rectangle in sketch). Now connect them with as smooth a curve as possible.
Right, now we have the dip. For what comes next there are two different methods.
One is to cut away the superfluous fabric of the dip. The drawback is that you can't correct any mistakes you may have made drawing the dip. Moreover, the skirt cannot be adapted to a new fashion style, or the fabric re-used for a new garment, at least not as easily as if the fabric was still an uncut rectangle. It seems from some Janet Arnold patterns that this method was used for extant skirts, but I don't think that it was the usual one. Many extant 18th century garments (e.g. the Manteau, English Mantua and Francaise) show a conspicuous lack of cutting, as if the original maker had already had later revampings in mind. The very same types of robes were often re-fashioned later. Small wonder if you consider that a seamstresses pay was but a tenth of the price of a mere yard of Spitalfields silk.
The other method, which I prefer, leaves the fabric intact: The superfluous fabric is simply folded down into the wrong side of the skirt along the line. Stick in pins, vertical to the line, every 5 cm. When you're finished, baste along the dip line, about 1 cm down from the fold edge, then remove the pins. Iron down the folded edge very seriously.
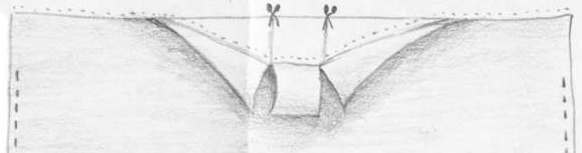
If the fabric if very stiff or thick, the folded-down fabric may cause the top of the skirt to bulge in an ugly way because the former top edge of the skirt is shorter than the top edge of the dip. In a museum I've seen what may be a possble solution: A skirt sported two cuts vertically down from the top edge, one on either side of the centre front. From the lower ends of each cut, a diagonal fold line ran towards the top skirt edge. I'd puzzled over that for a while because up until then I'd only known the cut-away dips from Janet Anronld's books. The result of that puzzling was the above fold-away method. The two vertical cuts served to take the strain off the too-short former top edge by allowing it to gape:
The new top edge is now pleated. From the centre front, leave about 10 cm un-pleated, then lay pleats facing towards the side. From the centre back, lay pleats facing towarnds the back. If the back panel of the skirt is wider than the front, you should make the centre back pleats considerably deeper, or lay more of them. Both the front and back skirt panel may be slightly larger than the waist width.
Making the pleats both symmetric and corresponding to the waist width is no easy task. If you feel like cursing, please feel free. You won't be alone.
When you've managed the pleats, baste them down well. Close the side seams of the skirt if you haven't done that yet. Now you can try it on over the panier or pocket hoops to see if the hem is straight. You should wear the stays, too, because they may influence the hang of the skirt.
The hem is neatened by folding it once, if it's a non-fraying woolen, or twice in any othe case. Another method especially suited for fine fabrics is to attach a strip of 7-12 cm wide cheap fabric to the hem, iron out the seam, then fold the cheap fabric upwards into the left side of the skirt so that it sticks out 5-8 mm from underneath the skirt hem proper. The upper edge of the cheap fabric should be sewn to the skirt fabric using very small hem stitches.
For the waistband, cut four times your waist circumference from a 2-2,5 cm (1 in) wide band and cut in half. Use one half each on the front and back panel of the skirt, folding it over the edge as if to neaten it. See here to find out why the ends should be so long.
In case of late (later 1770s and 1780s) skirts which were worn with bum pads rather than side hoops, the dip must have a different shape: The maximum skirt length is not around the sides, but around the back, so the dip is not in the front and back, but everywhere but the back.
Moreover, the skirt should have more width around the back than the front. In case of two panela at 150 cm width each, that would mean you'd have to cut one of the pocket slits into the fabric.
1) Hoops can be camouflaged in two ways: 1. a thick but fluffy,
i.e. relatively lightweight fabric (a heavy one would press the hoops down),
e.g. flannel or two layers of silk quilted over (unspun) wool or cotton padding.
2. A very thin, lightweight, but preferably stiff fabric laid into lots of pleats,
thus requiring a lot of skirt width.
2) the longer the skirt, the wider it should be so that it can flare from waist
to seam in a smooth line. This is especially true if you have enlargened the
hoop skirt to keep the proportion.
3) Salmon, Xavier (ed.) Madame de Pompadour: L'Art et l'Amour.
München: Hypo-Kulturstiftung, 2002
Content, layout and images of this page
and any sub-page of the domains marquise.de, contouche.de,
lumieres.de, manteau.de and costumebase.org are copyright (c) 1997-2022 by Alexa Bender. All rights
reserved. See Copyright Page.

GDPO


This work is licensed under a Creative Commons License.